

To identify worn bearings causing vacuum rattling, listen for abnormal noises like grinding or rattling during operation. Visually inspect the bearings for signs of wear such as corrosion, pitting, or discoloration. Use a vibration analyzer or ultrasonic testing to detect irregular vibrations or overheating. Manually rotate the bearings to check for smoothness, and guarantee proper lubrication. Keep an eye on these signs and techniques to diagnose issues early—you’ll find more tips below.
Key Takeaways
- Listen for persistent rattling noises during operation, especially under load or acceleration.
- Visually inspect bearings for signs of corrosion, pitting, or debris buildup.
- Manually rotate bearings to check for smooth movement and detect abnormal resistance or wobbling.
- Use vibration analysis tools to identify irregular vibrations indicating bearing wear.
- Check lubrication status; dry or contaminated bearings often produce rattling sounds.

HARDK Automotive Mechanic Stethoscope Diagnostic Tool
Provides a quick and reliable method for locating and identifying trouble in engines and other moving parts
As an affiliate, we earn on qualifying purchases.
As an affiliate, we earn on qualifying purchases.
Common Causes of Vacuum Rattling Noises
Vacuum rattling noises often indicate that something is wrong with the engine’s vacuum system, and worn or damaged bearings are a common culprit. When bearings aren’t properly lubricated, friction increases, causing abnormal vibrations that generate noise. Regular bearing lubrication helps reduce friction and prevent these issues. Vibration analysis can be a valuable tool in diagnosing such problems early, as it detects irregular vibrations caused by bearing wear or imbalance. Additionally, using specialized diagnostic tools can improve accuracy in identifying the root cause. If you notice persistent rattling, it’s essential to check the bearings’ lubrication status and perform vibration analysis to pinpoint the source. Addressing lubrication issues and monitoring vibrations can prevent further damage, ensuring your engine runs smoothly and quietly. Identifying these causes early saves time and costly repairs down the line.

Industrial Vibration Analyzer – VM-428 with External Sensor & PC Software, Acceleration 0.1–300 m/s², Velocity 1–850 mm/s, Displacement 1–3300 µm, 30Hz–14kHz, ISO Machine Rating
PROFESSIONAL VIBRATION ANALYZER – VM-428 WITH EXTERNAL SENSOR – Designed for advanced vibration diagnostics on motors, turbines, pumps,…
As an affiliate, we earn on qualifying purchases.
As an affiliate, we earn on qualifying purchases.
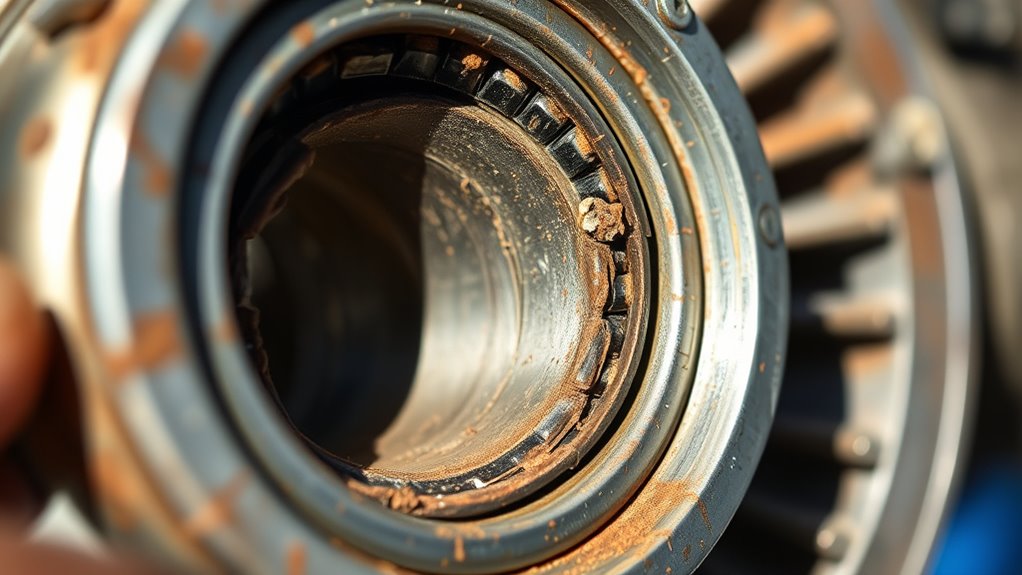
How to Recognize Signs of Bearing Wear

Recognizing the signs of bearing wear early can save you from costly repairs and prevent engine performance issues. One key indicator is rotor imbalance, which can cause vibrations or a rattling noise during operation. If you notice uneven vibrations or a consistent rattling, it might signal worn bearings. Lubrication failure is another critical sign; insufficient or contaminated lubrication leads to increased friction, overheating, and eventual bearing damage. Listen for unusual noises, especially during acceleration or under load, as these often point to bearing issues. Additionally, visual signs like discoloration, corrosion, or pitting on bearing surfaces suggest deterioration. Addressing these symptoms promptly helps you avoid more extensive damage and keeps your engine running smoothly. Staying informed about payment processing technologies and security measures can help prevent data breaches that compromise your systems. Stay attentive to these signs to catch bearing wear early.

MR CARTOOL V308 Injector Cleaner Machine 4-Cylinder, 110V Injector Cleaner Tester Machine Heated Ultrasonic Fuel System Injection Cleaning Kit for Diesel Gasoline Car Motorcycle
[ULTRASONIC INJECTOR CLEANER AND TESTER ] V308 can be used for cleaning and testing four injectors at the…
As an affiliate, we earn on qualifying purchases.
As an affiliate, we earn on qualifying purchases.
Tools and Techniques for Diagnosing Bearing Issues

Wondering how to accurately diagnose bearing issues before they cause serious damage? Start with simple tools like a stethoscope or vibration analyzer to listen for unusual noises or detect irregular vibrations. Regular lubrication maintenance is essential; inspecting lubrication levels and quality can reveal early signs of wear. Use ultrasonic testing to pinpoint bearing faults without disassembly. Temperature sensors can identify overheating, another indicator of problems. When issues are confirmed, timely bearing replacement prevents further damage. Visual inspections with magnifying tools help spot surface cracks or corrosion. Monitoring techniques are crucial for early fault detection, enabling proactive maintenance. Combining these techniques allows you to catch early warning signs and plan maintenance proactively. Proper diagnosis guarantees you address issues promptly, saving time and money while maintaining best vacuum system performance.

Liberty Oil, 1oz Bottle of The Best 100% Synthetic Oil for Lubricating R/C Radio Controlled Cars and All Types of Vehicles. Does Not Evaporate and Cause Build up on Gears and Moving Parts!!!
As an affiliate, we earn on qualifying purchases.
As an affiliate, we earn on qualifying purchases.
Step-by-Step Guide to Inspecting Vacuum Bearings
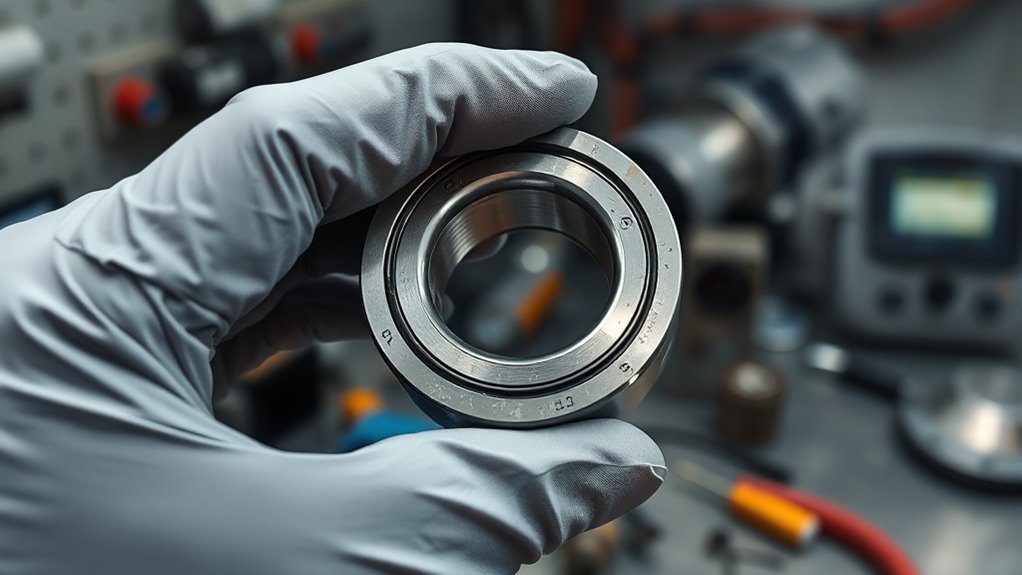
Are you ready to perform an effective inspection of vacuum bearings? Start by turning off the equipment and ensuring proper vacuum maintenance procedures. Visually examine the bearings for signs of wear, corrosion, or debris. Next, gently rotate the bearing by hand; smooth movement indicates good condition, while roughness or wobbling suggests damage. Check the bearing lubrication—if it’s dry or contaminated, re-lubricate according to manufacturer specs. Listen for unusual noises like rattling or grinding during manual rotation, which indicate worn components. Use a flashlight for a closer look at seals and housing for leaks or cracks. Record your findings and plan for further testing if necessary. Regular inspections help prevent unexpected failures and extend bearing lifespan through proper vacuum maintenance. Biodiversity principles remind us that healthy, well-maintained systems are vital for sustainability and longevity.
Preventative Measures to Extend Bearing Lifespan

Implementing preventative measures is key to prolonging the lifespan of vacuum bearings. Regular lubrication maintenance is essential; verify you apply the correct lubricant at recommended intervals to reduce friction and prevent wear. Keep an eye on operating conditions, such as temperature and contamination, which can accelerate deterioration. Address issues promptly by replacing bearings before they fail completely—early bearing replacement minimizes damage and downtime. Inspect bearings periodically for signs of wear or noise, and don’t delay maintenance if you notice any irregularities. Proper lubrication, routine checks, and timely bearing replacement help you avoid rattling noises and extend bearing life. Consistent preventative care ultimately saves you money and keeps your vacuum system running smoothly. Utilizing protective styling techniques can also help reduce exposure to environmental factors that contribute to bearing wear.
Frequently Asked Questions
Can Vacuum Rattling Noises Indicate Issues Unrelated to Bearings?
Yes, vacuum rattling noises can indicate issues beyond worn bearings. Your vacuum system has multiple noise sources, such as loose hoses, obstructed airflow, or damaged valves. These problems can produce rattling sounds without bearing wear. To pinpoint the cause, check for loose connections, blockages, or faulty components. Addressing these issues promptly guarantees your vacuum system operates smoothly and prevents further damage.
Are There Specific Models More Prone to Bearing Wear?
Certain vacuum models are more prone to bearing wear due to model vulnerabilities and manufacturer differences. You might notice rattling noises more frequently in older or budget models, which often have less durable bearings. Some manufacturers use higher-quality components, reducing this issue. To avoid unexpected repairs, research specific models’ reliability and consider manufacturer reputation, especially if you use your vacuum heavily or for demanding cleaning tasks.
How Often Should Vacuum Bearings Be Inspected for Optimal Performance?
You should inspect vacuum bearings regularly to maintain ideal performance. Follow your equipment’s maintenance schedules, typically every 6 to 12 months, depending on usage. Use inspection methods like visual checks for wear, noise detection, and vibration analysis to identify early signs of deterioration. Consistent inspections help catch issues early, reducing downtime and preventing costly repairs. Staying proactive with these checks keeps your vacuum system running smoothly and efficiently.
What Are the Long-Term Effects of Ignoring Bearing Wear Signs?
Ignoring signs of bearing wear is like neglecting a ticking time bomb. Over time, bearing corrosion and lubrication failure will worsen, causing your vacuum system to falter or even break down completely. This neglect leads to costly repairs, decreased efficiency, and potential damage to other components. Don’t let small issues grow into major disasters—regular inspections and timely maintenance safeguard your equipment’s longevity and keep your system running smoothly.
Can DIY Repairs Effectively Fix Worn Vacuum Bearings?
You can attempt DIY fixes for worn vacuum bearings, but it depends on your skill level. If you’re comfortable with bearing replacement, you might successfully fix the issue yourself, saving time and money. However, improper DIY repairs can lead to further damage or incomplete fixes. Carefully follow instructions, use the right tools, and consider professional help if you’re unsure. Proper bearing replacement guarantees your vacuum operates smoothly again.
Conclusion
Now that you know how to spot worn bearings and diagnose vacuum rattling, you can save your equipment from catastrophic failure. Don’t ignore that faint squeal or shaky operation—your vacuum’s future depends on it! By catching issues early, you could prevent a disaster that costs you more than you can imagine. Take action today, or risk facing a total breakdown that could shut down your entire operation forever. The choice is yours—be proactive or pay the price!