For clean fish finder results, mount your transducer on a flat, smooth spot beneath your kayak’s hull, ideally near the stern or keel. Make sure it’s fully submerged, parallel to the bottom, and away from turbulence or debris. Use waterproof brackets or adhesive mounts for stability, and keep it flush with the hull to avoid drag. Proper placement minimizes interference and boosts performance—keep reading to discover exactly how to find the perfect spot for your kayak.
Key Takeaways
- Mount the transducer on a flat, smooth spot near the kayak’s stern or keel for stable, clear readings.
- Ensure the transducer is fully submerged and parallel to the hull for accurate sonar performance.
- Choose a location with smooth water flow, avoiding turbulence, debris, and spray-prone areas.
- Use waterproof brackets or adhesive mounts suitable for your kayak’s material to secure the transducer firmly.
- Test and adjust the transducer position regularly to maintain optimal alignment and minimize interference.

Scotty 0141 Kayak/SUP Transducer Mounting Arm, C/W # 0438
- Universal transducer mounting: Easy installation for kayak and SUP
- Includes gear-head track adapter: Compatible with Scotty slide track
- Quick accessory attachment: Drop and lock Fishfinder or Scotty mounts
As an affiliate, we earn on qualifying purchases.
As an affiliate, we earn on qualifying purchases.
Introduction: Why Proper Transducer Mounting Matters for Kayak Fish Finders
Proper transducer mounting is essential for getting accurate and reliable readings from your kayak fish finder. When you mount it correctly, you guarantee better data, which benefits both your fishing success and your understanding of marine biology. Accurate readings help you identify fish, structures, and underwater features more effectively. Additionally, secure mounting enhances kayak safety by preventing the transducer from coming loose or causing instability. Misaligned or loose transducers can lead to false readings, making it harder to navigate safely. Proper placement also minimizes drag and water resistance, maintaining your kayak’s stability. Remember, a well-mounted transducer not only improves your fishing experience but also keeps you safe while exploring underwater environments. Ensuring proper mounting is a vital step in your kayak fishing setup, as it reflects the importance of emotional resilience in overcoming challenges on the water. Furthermore, understanding digital concepts can enhance your ability to interpret the data you receive from the fish finder effectively.
How to Choose the Best Mounting Spot for Your Transducer on a Kayak

Choosing the right spot for your transducer is vital for accurate readings, so focus on the ideal hull placement. Make certain it avoids air bubbles and turbulence that can interfere with sonar signals. Also, guarantee the transducer is securely mounted to prevent movement that could distort your fish finder’s performance. Additionally, understanding color accuracy can help you interpret your sonar readings more effectively.
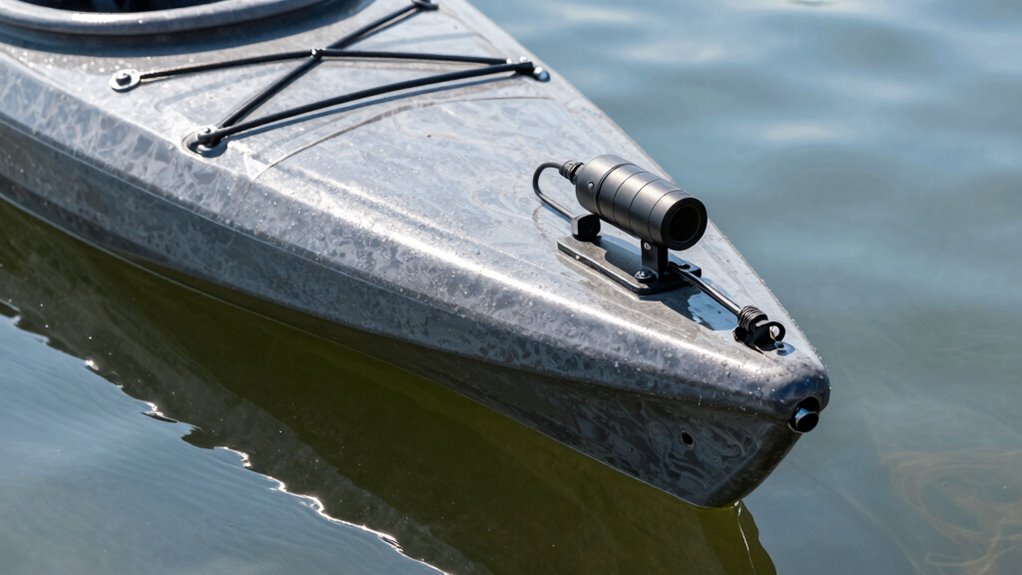
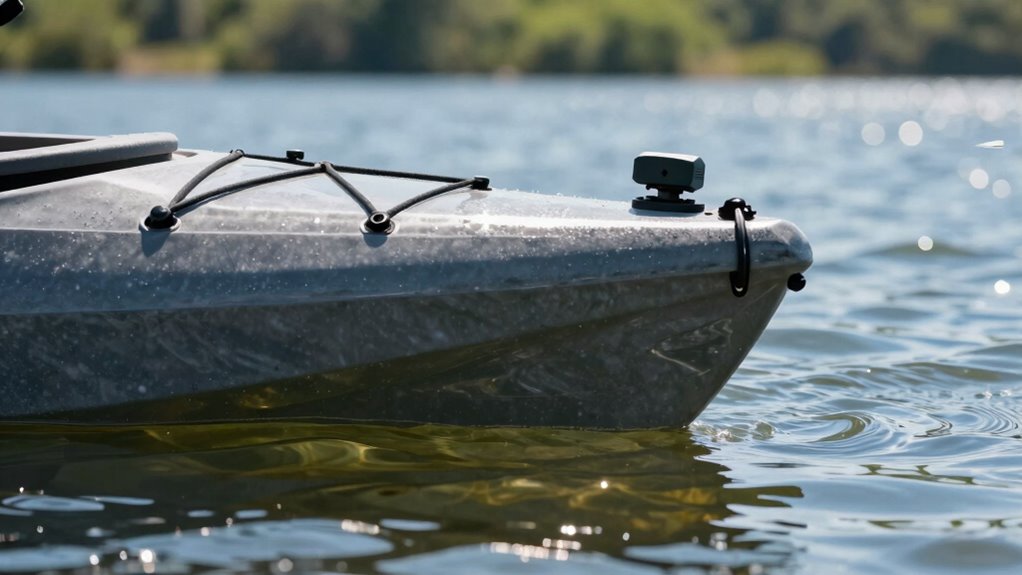
Optimal Hull Placement
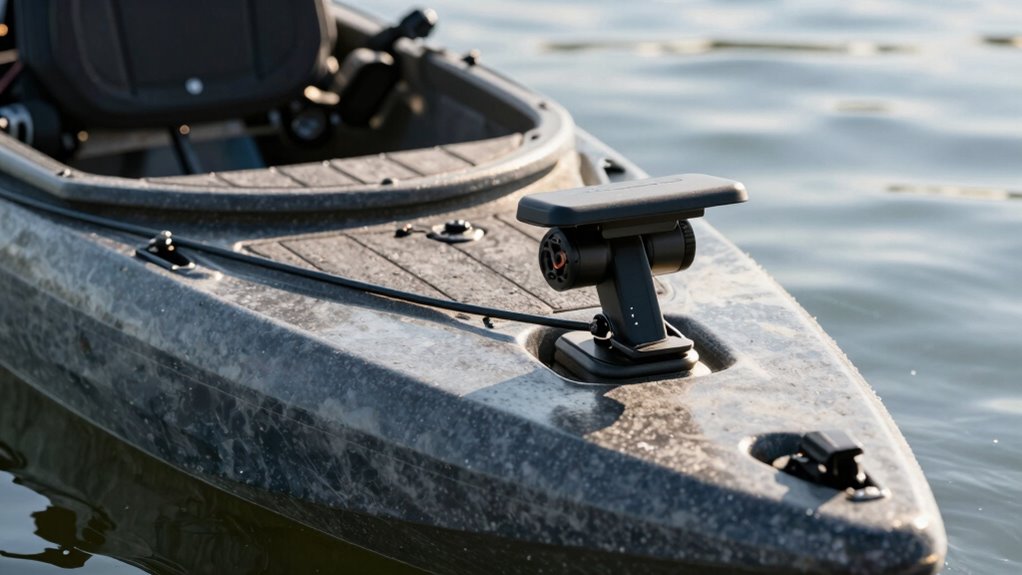
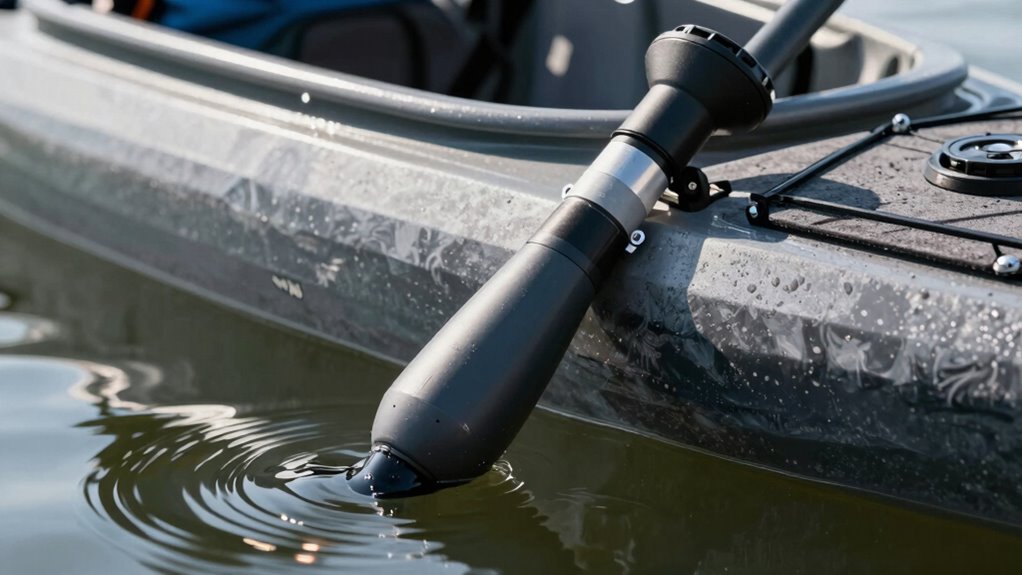
Where you place your transducer on a kayak can make all the difference in getting accurate fish finder readings. For ideal hull placement, choose a spot that’s flat and smooth, typically on the keel or near the stern, to minimize turbulence. Confirming the transducer is fully submerged and aligned parallel to the kayak’s bottom helps improve signal clarity. Incorporating gentle stretching can also enhance your comfort while fishing. When selecting kayak accessories, look for mounts designed for specific hull types to secure the transducer firmly. Additionally, using high-quality car protection accessories can prevent damage from rough conditions. Avoid mounting in areas prone to air bubbles or turbulence, as these can distort readings. Proper placement also considers your fishing style and kayak design, so experiment with different spots until you find the most stable, clean signal source. This guarantees your marine electronics perform at their best. Additionally, investing in luxury lifestyle products can enhance your overall fishing experience while ensuring comfort and efficiency on the water. To optimize your setup, consider waterpark safety tips that can also apply to outdoor activities, ensuring a secure and enjoyable experience on the water. Moreover, understanding high volatility risks in the market can help you make informed decisions about your fishing gear investments.
Avoiding Air Bubbles
Have you ever noticed distorted or unclear fish finder readings while paddling? Air bubbles are often the culprit, disrupting the signal. To avoid this, choose a mounting spot where water flow is smooth, minimizing turbulence. The key is to find an area where surface tension keeps the water stable around the transducer, reducing the formation of bubbles. Avoid mounting the transducer near areas with rapid water movement, such as near the kayak’s hull or thrusters, which can create turbulence and trap air. Instead, opt for a flat, calm spot below the waterline, where water flows steadily. This helps maintain a bubble-free environment, ensuring clearer readings and more accurate fish detection. Proper placement makes a significant difference in your kayak’s fish finder performance. Additionally, consider the impact of effective stain removal techniques to keep your kayak clean and free from residue that could interfere with performance. A well-maintained first aid kit is also essential for any unexpected emergencies while you’re out on the water. Furthermore, integrating eco-friendly natural pools into your kayaking adventures can enhance the overall experience with a focus on sustainability. To enhance your skills, remember that drone insights can provide valuable data for improving your fishing strategy. Furthermore, maintaining a clean environment around the transducer is crucial for optimal function, as even portable oil radiators can affect nearby water quality.
Ensuring Transducer Stability
Ensuring your transducer stays stable is essential for accurate fish finder readings, and the key lies in selecting the right mounting spot. You want a position where water flow is smooth and consistent, preventing turbulence that can cause erratic readings. Look for a spot just below the hull’s surface where water flows freely around the transducer. Consider the transducer materials, choosing durable, corrosion-resistant options like plastic or stainless steel that can withstand water conditions and impact. Secure the transducer firmly to avoid movement caused by paddling or waves. A stable mount minimizes vibrations and keeps the transducer aligned correctly, ensuring clear, reliable sonar images. Proper stability directly impacts your ability to detect fish and underwater structures accurately. Additionally, gear care tips can help ensure your equipment remains in top condition, enhancing overall performance.
Top Locations for Mounting Your Transducer on a Kayak
Thinking about the best spots to mount your transducer can considerably improve your fish finder’s performance on a kayak. The ideal locations include the kayak’s hull, where the transducer can stay submerged and stable. Mounting near the transom often offers consistent readings and easier access to power sources, which can help preserve battery life. Additionally, utilizing emerging technologies in fish finders can enhance your overall fishing experience. Consider color options for the transducer mount—some colors blend better with your kayak, reducing visibility and avoiding distractions. Placing the transducer in a spot with minimal turbulence ensures clearer readings and extends battery life by reducing power drain. It’s also important to consider proper cleaning methods for the transducer, as this can significantly impact performance. Avoid mounting in areas prone to debris or water spray that can interfere with signals. Additionally, choosing a location that minimizes signal interference can enhance your fish finder’s accuracy and effectiveness. To achieve optimal performance, be sure to consider effective noise reduction techniques that can further improve your readings. Choosing the right location balances performance, durability, and aesthetics, giving you reliable fish-finding capabilities on the water.
How to Mount Your Transducer on the Hull or Side of Your Kayak
Mounting your transducer on the hull or side of your kayak requires careful consideration of techniques and placement to guarantee accurate readings. You’ll want to evaluate hull mounting methods that minimize interference, as well as side mount options that improve accessibility and performance. Choosing the right approach depends on your kayak’s design and your fishing style. Additionally, utilizing eco labels can help ensure that your gear choices are environmentally friendly while enhancing your overall fishing experience. Understanding the role of cybersecurity tactics can also be crucial in protecting your fishing electronics from potential threats.
Hull Mounting Techniques
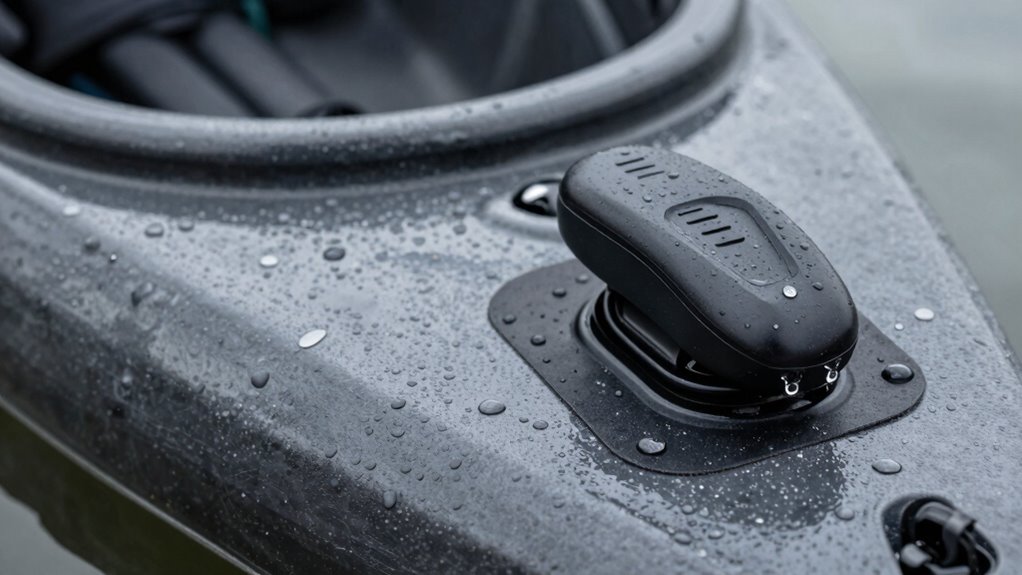
Attaching your transducer directly to the hull or side of your kayak offers a stable and reliable way to get accurate fish readings. For hull mounting, consider the material of your kayak; some surfaces work better with specific mounting hardware. Use waterproof, durable adhesive mounts or screws designed for marine use. When choosing a transducer, look for color options that match your kayak’s aesthetic. Additionally, proper heat buffering techniques can help ensure that your transducer operates effectively without interference. Also, verify it’s compatible with your battery setup for easy power management. Proper sealing and positioning prevent water interference and noise, improving reading clarity. Incorporating must-see destinations can inspire you to explore new fishing spots while ensuring an enriching experience. Quality materials are essential for a long-lasting installation and will enhance your overall fishing experience. Keep in mind that a secure, flush mount minimizes drag and disturbance. With these techniques, your transducer stays steady, providing consistent, clean readings in various conditions. Additionally, implementing smart home safety automation** can enhance your overall fishing experience by monitoring kayak conditions remotely.
Side Mounting Considerations
Have you considered how side mounting your transducer can enhance your kayak’s performance? Side mounting can improve readings by reducing turbulence and maintaining kayak stability. When mounting on the side, make certain the transducer is flush with the hull to prevent drag or damage. It’s crucial to choose a secure, waterproof bracket that keeps the transducer stable during paddling. Proper positioning minimizes interference from hull turbulence, leading to clearer readings in your marine electronics. Here’s a quick comparison:
| Aspect | Benefits |
|---|---|
| Hull Mounting | Better stability, less turbulence |
| Side Mounting | Clearer readings, easy access |
| Stability | Maintains kayak balance |
This setup balances performance with kayak stability, ensuring smooth navigation and accurate fish detection.
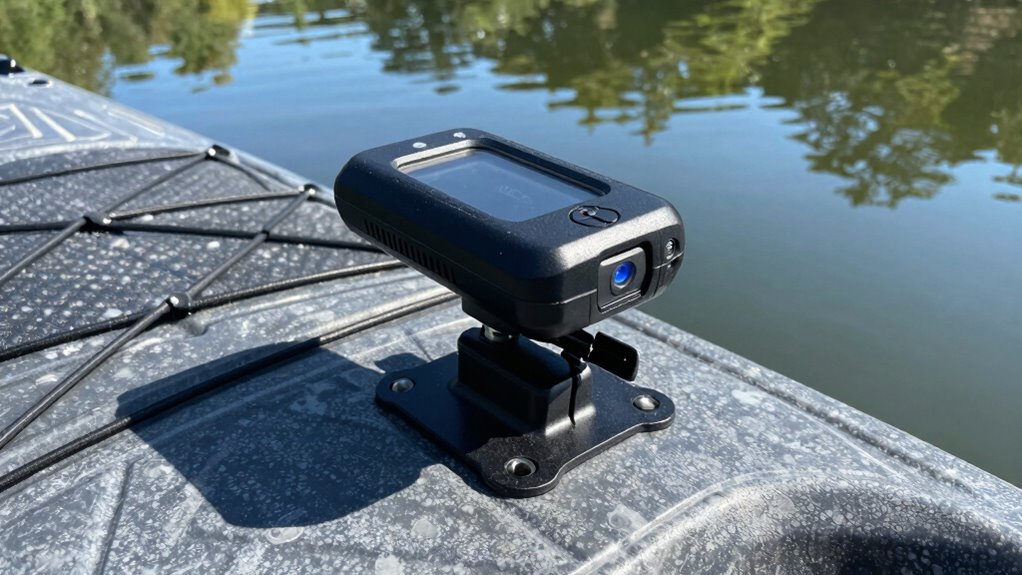
Securing Your Transducer With Mounting Brackets and Pads

To guarantee your transducer stays secure and functions properly, using mounting brackets and pads is essential. Properly securing it ensures correct transducer orientation and compatibility with your kayak’s mounting surface. Here’s what to focus on:
- Choose the right bracket that matches your transducer’s size and shape.
- Ensure mounting surface compatibility by selecting pads that conform to your kayak’s hull.
- Align the transducer so it faces downward and is parallel to the waterline for accurate readings.
- Use padding to prevent vibrations and protect the hull from scratches.
Following these steps helps maintain optimal transducer performance and longevity. Proper mounting reduces false readings and keeps your setup stable during your fishing trips.
Avoid Common Mounting Mistakes and How to Fix Them
Even experienced kayak anglers can make mounting mistakes that compromise transducer performance. Common errors include improper angle, poor alignment, or ignoring manufacturer recommendations. These mistakes can lead to inaccurate readings or damage. To fix them, ensure the transducer is mounted flat and aligned with the kayak’s hull, following manufacturer recommendations. Aesthetic concerns might tempt you to hide the mount, but prioritize function over looks. Proper placement reduces drag and improves readings. Use the table below to visualize common mistakes and solutions:
| Mistake | Fix |
|---|---|
| Improper angle | Adjust to match hull and transducer guidelines |
| Poor alignment | Use level tools for precise positioning |
| Ignoring manufacturer advice | Follow specific mounting instructions |
| Aesthetic neglect | Mount discreetly without sacrificing performance |
| Inconsistent positioning | Mark mounting spots for consistency |
How to Test and Fine-Tune Your Transducer for Better Readings
Testing and fine-tuning your transducer is essential to guarantee you get accurate readings from your fish finder. First, check the sensor calibration by comparing readings in different water conditions—adjust if needed. Next, verify the transducer’s positioning, ensuring it’s flush and stable to prevent signal interference. Third, monitor water temperature, as it affects readings; update your fish finder’s settings accordingly. Finally, perform a test in calm water: observe the sonar image and make adjustments to the tilt or angle if the readings seem off. Regularly calibration and water temperature checks help optimize performance, giving you clearer, more reliable data. Proper testing ensures your transducer delivers precise readings, enhancing your kayak fishing experience.
When to Use Special Mounting Accessories for Your Transducer
Sometimes, standard transducer mounts don’t provide the stability or positioning you need for ideal readings, especially in challenging conditions. When you encounter rough water or complex kayak movements, using specialized mounting accessories can improve stability and accuracy. These accessories help you position the transducer precisely, guaranteeing consistent signals and clear readings. If your transducer isn’t compatible with your kayak’s existing mount, or if you need a unique angle, investing in compatible mounting accessories becomes essential. They allow you to customize the setup, avoiding issues like cavitation or poor signal reception. Knowing when to use these accessories ensures your fish finder performs reliably, giving you better data and a more enjoyable fishing experience. Proper mounting accessories are key to maximizing your transducer’s potential in diverse conditions.
Troubleshooting Poor Fish Finder Readings and Adjusting Mounting Position
Poor fish finder readings can often be traced back to the transducer’s mounting position or orientation. To troubleshoot, start by checking if your transducer is mounted correctly, avoiding areas that interfere with kayak maintenance. Next, consider these steps:
- Adjust the transducer angle to ensure it’s perpendicular to the kayak bottom.
- Verify that the transducer is firmly secured, avoiding loose mounting that causes noise.
- Check for any debris or fouling on the transducer surface, which can distort readings.
- Confirm you’re complying with fishing regulations regarding transducer placement and visibility.
Frequently Asked Questions
Can I Mount the Transducer on Inflatable Kayaks?
Yes, you can mount the transducer on an inflatable kayak, but it requires careful consideration of inflatable kayak compatibility and your preferred setup. For a permanent mounting option, use waterproof, secure brackets designed for inflatables. Make certain the transducer is properly sealed and protected from water ingress. You might also consider temporary or semi-permanent mounts if you want flexibility, but always prioritize stability and waterproofing for accurate readings and safety.
What Tools Are Needed for Transducer Mounting?
You’ll need basic tools like a drill, screwdriver, and possibly a utility knife for transducer mounting. Use mounting adhesives to secure the transducer if you prefer a permanent setup, or transducer brackets for a removable option. Make certain to clean the area thoroughly before applying adhesives, and confirm brackets are firmly secured to prevent movement. These tools and materials help you achieve a clean, stable installation for accurate fish finder readings.
How Often Should I Check the Transducer’s Position?
You should check your transducer’s position regularly, especially before each trip, to guarantee mounting stability. This helps maintain accurate readings and allows you to spot any signs of misalignment or damage that could affect transducer calibration. Frequent checks also ensure your transducer stays securely mounted, avoiding false readings or damage. Adjust the mount if you notice any movement, and recalibrate if needed to keep your fish finder functioning at its best.
Is It Possible to Mount the Transducer Temporarily?
Yes, you can definitely mount the transducer temporarily. To guarantee transducer stability during your temporary installation, use suction cups or clamps that won’t damage your kayak. These options keep the transducer secure while allowing easy removal. This setup is perfect for testing or short trips, but remember, a stable, well-mounted transducer provides the best readings. Always check its position before each use for peak performance.
How Does Water Temperature Affect Transducer Performance?
Water temperature can impact transducer performance because it influences water conductivity, which affects how signals are transmitted. As temperature changes, you might notice less accurate readings. To guarantee accuracy, you should regularly calibrate your sensor, especially in fluctuating temperatures. Proper calibration ensures your fish finder interprets signals correctly regardless of water temperature, giving you clearer readings and better fishing success.
Conclusion
Now that you know where and how to mount your transducer, the key is precision. A perfect setup can transform your fishing experience, revealing secrets beneath the surface you never knew existed. But don’t stop there—small adjustments can make all the difference. Are you ready to uncover the full potential of your fish finder? The water’s mysteries await, and your next big catch could be just one perfect mount away.