
TL;DR
A closet can serve as an effective vocal booth or AI rig space if you focus on acoustic dampening, proper placement, and ventilation. Covering walls, sealing gaps, and strategic mic positioning matter more than expensive foam or full soundproofing.
Ever noticed how a tiny closet can turn into a surprisingly good recording nook? It’s all about what you do with the space. Most folks jump straight to buying foam panels or soundproofing, but the real magic lies in smart placement and treating the room’s leaks and reflections.
If you want a quiet, clear, professional sound — whether for vocals, voiceover, or AI rigs — you need to think beyond just absorbing sound. This guide shows you the best ways to dampen noise, position your mic, and keep your gear cool, all while turning that cramped closet into a mini studio.
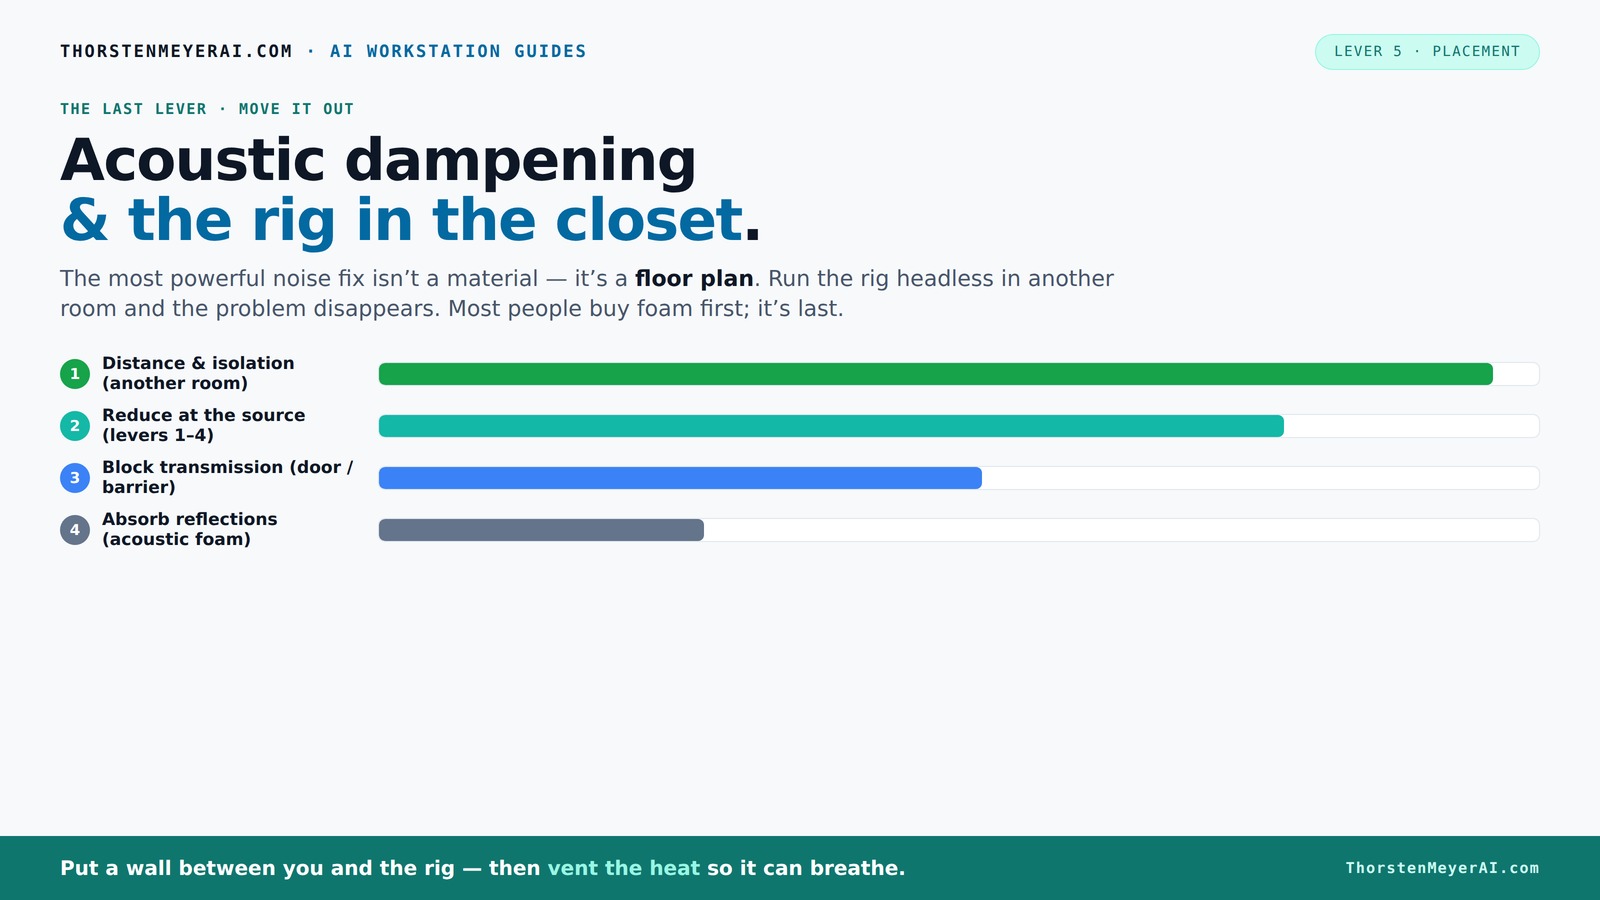
Acoustic dampening
& the rig in the closet.
The most powerful noise fix isn’t a material — it’s a floor plan. A rig you can’t hear because it’s in another room beats any amount of foam. Tap the approaches in Part 1 to see what actually works.
(another room)
(levers 1–4)
(door / barrier)
(acoustic foam)
Contain the noise, not the heat
Key Takeaways
- Sealing gaps and leaks around the door and vents is the first step toward a quieter closet studio. For detailed sealing techniques, see this guide on acoustic sealing.
- Position your mic away from reflective surfaces—6 to 12 inches from the wall— to reduce echo and comb filtering.
- Cover all hard surfaces with layered treatments like foam, blankets, or panels; coverage outweighs fancy products.
- Bass traps are helpful but often unnecessary unless you hear low-end booms or resonance issues.
- Ventilation is critical; a quiet exhaust fan or ducting prevents heat buildup that can throttle your gear and ruin your soundproofing efforts.

Focusound 52 Pack Acoustic Foam Panels 1" x 12" x 12" Sound Proof Foam Panles Soundproofing Noise Cancelling Wedge Panels for Home Office Recoding Studio with 300PCS Double-Side Adhesive
- Soundproofing Design: Triangular grooves for noise absorption
- Includes Adhesive Tape: 300pcs double-sided adhesive for easy installation
- Easy Shape Recovery: Soak in water to restore shape
As an affiliate, we earn on qualifying purchases.
As an affiliate, we earn on qualifying purchases.
Why Acoustic Dampening Isn’t Just About Foam — It’s About Reflection Control
Acoustic dampening in a closet isn’t just slapping foam on the walls. It’s about controlling how sound bounces around. The small, parallel surfaces of a closet create harsh reflections and standing waves that can muddy your recordings.
Think of it like a mirror maze — too many hard surfaces bounce sound back and forth, creating echo and muddiness. Covering key surfaces with thick absorption panels, especially the wall behind your mic, reduces this reverberation. For example, a 2-inch panel can absorb mid-range frequencies, but for bass-heavy low end, thicker or multiple layers work better.
Great DIY options include acoustic foam, moving blankets, or even thick curtains. Covering walls, ceiling, and the door—especially the gaps—can dramatically improve clarity. For more tips, see this guide on acoustic dampening.
Why does this matter? Because reflections and standing waves distort the true quality of your recordings. They can cause your voice to sound muffled or echoey, making editing more difficult and reducing professionalism. While absorption is crucial, it’s only part of the story; reflection control ensures that the sound reaching your mic is as natural and uncolored as possible. This step often involves tradeoffs: too much absorption can make the space sound dead or unnatural, so balancing absorption with natural room tone is key.
Where to Place Your Microphone for the Sweetest Sound in a Closet
Positioning your mic is the most impactful tweak in a tiny space. The goal: minimize reflections bouncing into the capsule. The best spot? Front and slightly off-center from reflective surfaces. Avoid placing the mic directly against a wall or near a hard surface like a window or mirror. Learn more about optimal mic placement in this article on mic positioning.
For example, in a tiny closet, setting the mic 6-12 inches away from the wall behind it, pointing slightly downward or inward, reduces early reflections. Using a small stand or shock mount helps keep the mic from picking up vibrations from the shelf or desk.
Remember, the proximity effect—being too close—can boost bass, so find a sweet spot that balances clarity and tone.
Why does this placement matter? Because sound reflections are strongest when the mic is too close to reflective surfaces, which can cause comb filtering and unnatural tonal coloration. Proper placement not only reduces unwanted echoes but also preserves the natural sound of your voice or instrument. The tradeoff is that placing the mic too far can pick up more room noise and leaks, so finding that optimal distance is a balancing act—closer for intimacy, farther for room ambiance.
Treat the Closet Door and Gaps — Seal the Sound Leaks First
Sound leaks through gaps, cracks, and the door — often the weakest link. Sealing these leaks is the first step toward a quieter space. Weatherstripping, acoustic sealant, or even a thick moving blanket over the door can block sound from escaping or entering.
For instance, a simple foam weatherstripping kit around the door frame can cut down noise leaks by 60%, making a huge difference. Curtains or blankets hung over the door can also dampen sound, especially if you’re on a budget.
Why does sealing leaks matter so much? Because leaks are the primary pathways for noise to enter or escape, undermining your acoustic treatment efforts. If you ignore leaks, even the best internal treatments will be less effective because sound can bypass them entirely. Sealing also prevents external noise from contaminating your recordings, which is crucial if you're in a noisy environment. The tradeoff: sealing can sometimes make access less convenient, but the improvement in sound isolation is well worth it. Practical DIY fixes include weatherstripping, draft stoppers, or hanging heavy blankets over gaps, all of which are inexpensive and easy to implement.
Why Bass Traps in a Closet Are Usually Overkill (But Sometimes Not)
Bass buildup in a tiny closet can cause boominess—think of it as low-end standing waves that make your voice or music sound muddy. Bass traps in corners help absorb these low frequencies. But in many cases, good wall treatment and mic placement can handle most issues.
However, if you notice a 'booming' sound or low-frequency resonances, adding bass traps or corner panels can tame those problem frequencies. For example, placing a 4-inch thick bass trap in each corner can reduce low-end resonances by up to 50%. The key is identifying whether these resonances are problematic—if your recordings sound muffled or boomy, addressing low frequencies is necessary.
In small spaces, treat the main reflection points first, then add bass traps if needed. Remember, coverage is king—more layers often beat out fancy single-product solutions. The tradeoff: bass traps can take up space and be costly, so weigh their benefits against your specific needs and budget.
Blankets, Foam, or Panels? What Works Best for a Closet Studio
Budget, portability, and effectiveness guide your choice here. Acoustic foam is affordable and easy to install but mainly absorbs mid and high frequencies. Moving blankets are a DIY hero—cheap, portable, and surprisingly effective at reducing reflections and noise. For more options, visit this resource on acoustic treatment.
For example, hanging a few moving blankets around your closet can cut reverb and echo by over 50%. Acoustic panels are more targeted but pricier, and best used in combination with blankets or foam.
In tiny spaces, layering a couple of blankets on the door, ceiling, and walls can make a dramatic difference. The key: more surface coverage usually beats a single, fancy product. The tradeoff: blankets are less durable and less precise than purpose-built panels, but their versatility and cost-effectiveness often outweigh these downsides.
Ventilation Is the Hidden Hero in a Closet Rig
Putting a high-power AI rig or a vocal booth in a closet means managing heat and sound simultaneously. Ventilation is the secret sauce. Without it, heat builds up fast—trapping hot air inside causes fans to ramp up, defeating your noise-reduction efforts.
Use active ventilation: a small exhaust fan vented outside, or a filtered duct system, keeps airflow moving. For example, a quiet 120mm fan pulling hot air out of a vent can keep temperatures stable while keeping noise levels down.
And don’t forget: the more you seal the space, the more critical ventilation becomes. A purpose-built soundproof cabinet with temperature controls is ideal but pricey. Otherwise, simple ducting and a controlled airflow can do wonders. Proper ventilation ensures your gear doesn’t overheat, which can cause hardware failures or degrade performance, especially during long sessions. It’s a tradeoff: better airflow often means some noise ingress, so balancing quiet operation with effective cooling is key.
Putting It All Together: Your DIY Closet Studio Checklist
Now you know the main ingredients: seal leaks, treat reflections, position the mic wisely, and manage heat. Here’s a quick checklist:
- Seal gaps with weatherstripping or blankets
- Cover walls, ceiling, and door with foam or blankets
- Place the mic 6-12 inches from reflective surfaces
- Add bass traps if low-end resonances persist
- Use a quiet exhaust fan or ducting for ventilation
In a tiny closet, layering these tactics transforms it into a surprisingly effective space for vocals, voiceover, or even light AI work. Remember, covering more surface area with absorption often beats overthinking placement or expensive gear.
Frequently Asked Questions
How much acoustic treatment does a closet need?
In most cases, covering the walls, ceiling, and door with foam or blankets is enough to significantly reduce reflections. You don’t need to treat every inch—just focus on the main reflection points and sealing gaps for best results.
Where should I place the microphone in a closet?
Place the mic about 6-12 inches away from the wall behind it, and avoid direct contact with reflective surfaces. Position it slightly off-center from walls to minimize early reflections and get a clean, natural sound.
Do I need bass traps in such a small space?
Usually not, unless you notice a boominess or resonance in the low end. If you do, placing bass traps in the corners can help tame those frequencies without overcomplicating your setup.
Can blankets replace foam panels?
Absolutely. Moving blankets and thick curtains are cost-effective, portable options that absorb sound reflections well. Layering blankets on walls, the door, and ceiling can make a big difference in echo reduction.
Is a closet studio truly soundproof?
Most closets can only reduce noise and reflections—they’re not full soundproof chambers. Sealing gaps and adding absorption helps, but complete soundproofing requires specialized, often expensive, modifications.
Conclusion
Turning your closet into a usable studio isn’t about perfect soundproofing; it’s about smart dampening, placement, and airflow. Treat leaks first, layer your acoustic coverage, and keep your gear cool. The result: clear, professional sound — in a space that’s otherwise just a tiny box.
So next time you see a closet, remember: with a few tweaks, it can be your best-kept secret for high-quality audio. Your voice, your AI, your creativity — all thriving in a small, well-tuned corner.